

A perfect self-tape is an act of technical invisibility; when your setup is flawless, your performance is the only thing a casting director sees. If you've ever felt a brilliant take was sabotaged by harsh shadows or distracting background noise, you know the frustration of technical barriers. It's common to feel overwhelmed by the pressure to be an actor, cinematographer, and sound engineer simultaneously. This guide will show you exactly how to make a self tape that mimics a professional casting studio, ensuring your technical execution is as sharp as your craft.
You deserve a workspace that empowers your talent rather than hiding it. By mastering these high-level standards, you'll gain the confidence to submit work that demands attention for the right reasons. We'll explore the essential equipment for 2026, the nuances of eyelines and framing, and the specific SAG-AFTRA regulations that protect your time and effort. From lighting setups that banish fatigue to sound techniques that capture every beat, you're about to transform your home auditions into your most powerful career tool. Let's ensure your talent is the only thing the industry notices.
Key Takeaways
- Learn why your smartphone is often a superior tool to a DSLR for creating studio-grade submissions that meet 2026 industry standards.
- Master the nuances of eyelines and memorization to ensure your connection with the camera remains unbroken and professional.
- Discover the precise editing and slating protocols that prevent technical errors from distracting casting directors from your performance.
- Follow our professional breakdown on how to make a self tape that serves as your primary tool for booking roles on competitive casting websites.
- Understand the value of expert feedback to help you maintain spontaneity and avoid the common pitfall of over-rehearsing your material.
The Self-Tape Standard: Why Your Home Setup is Your New Office
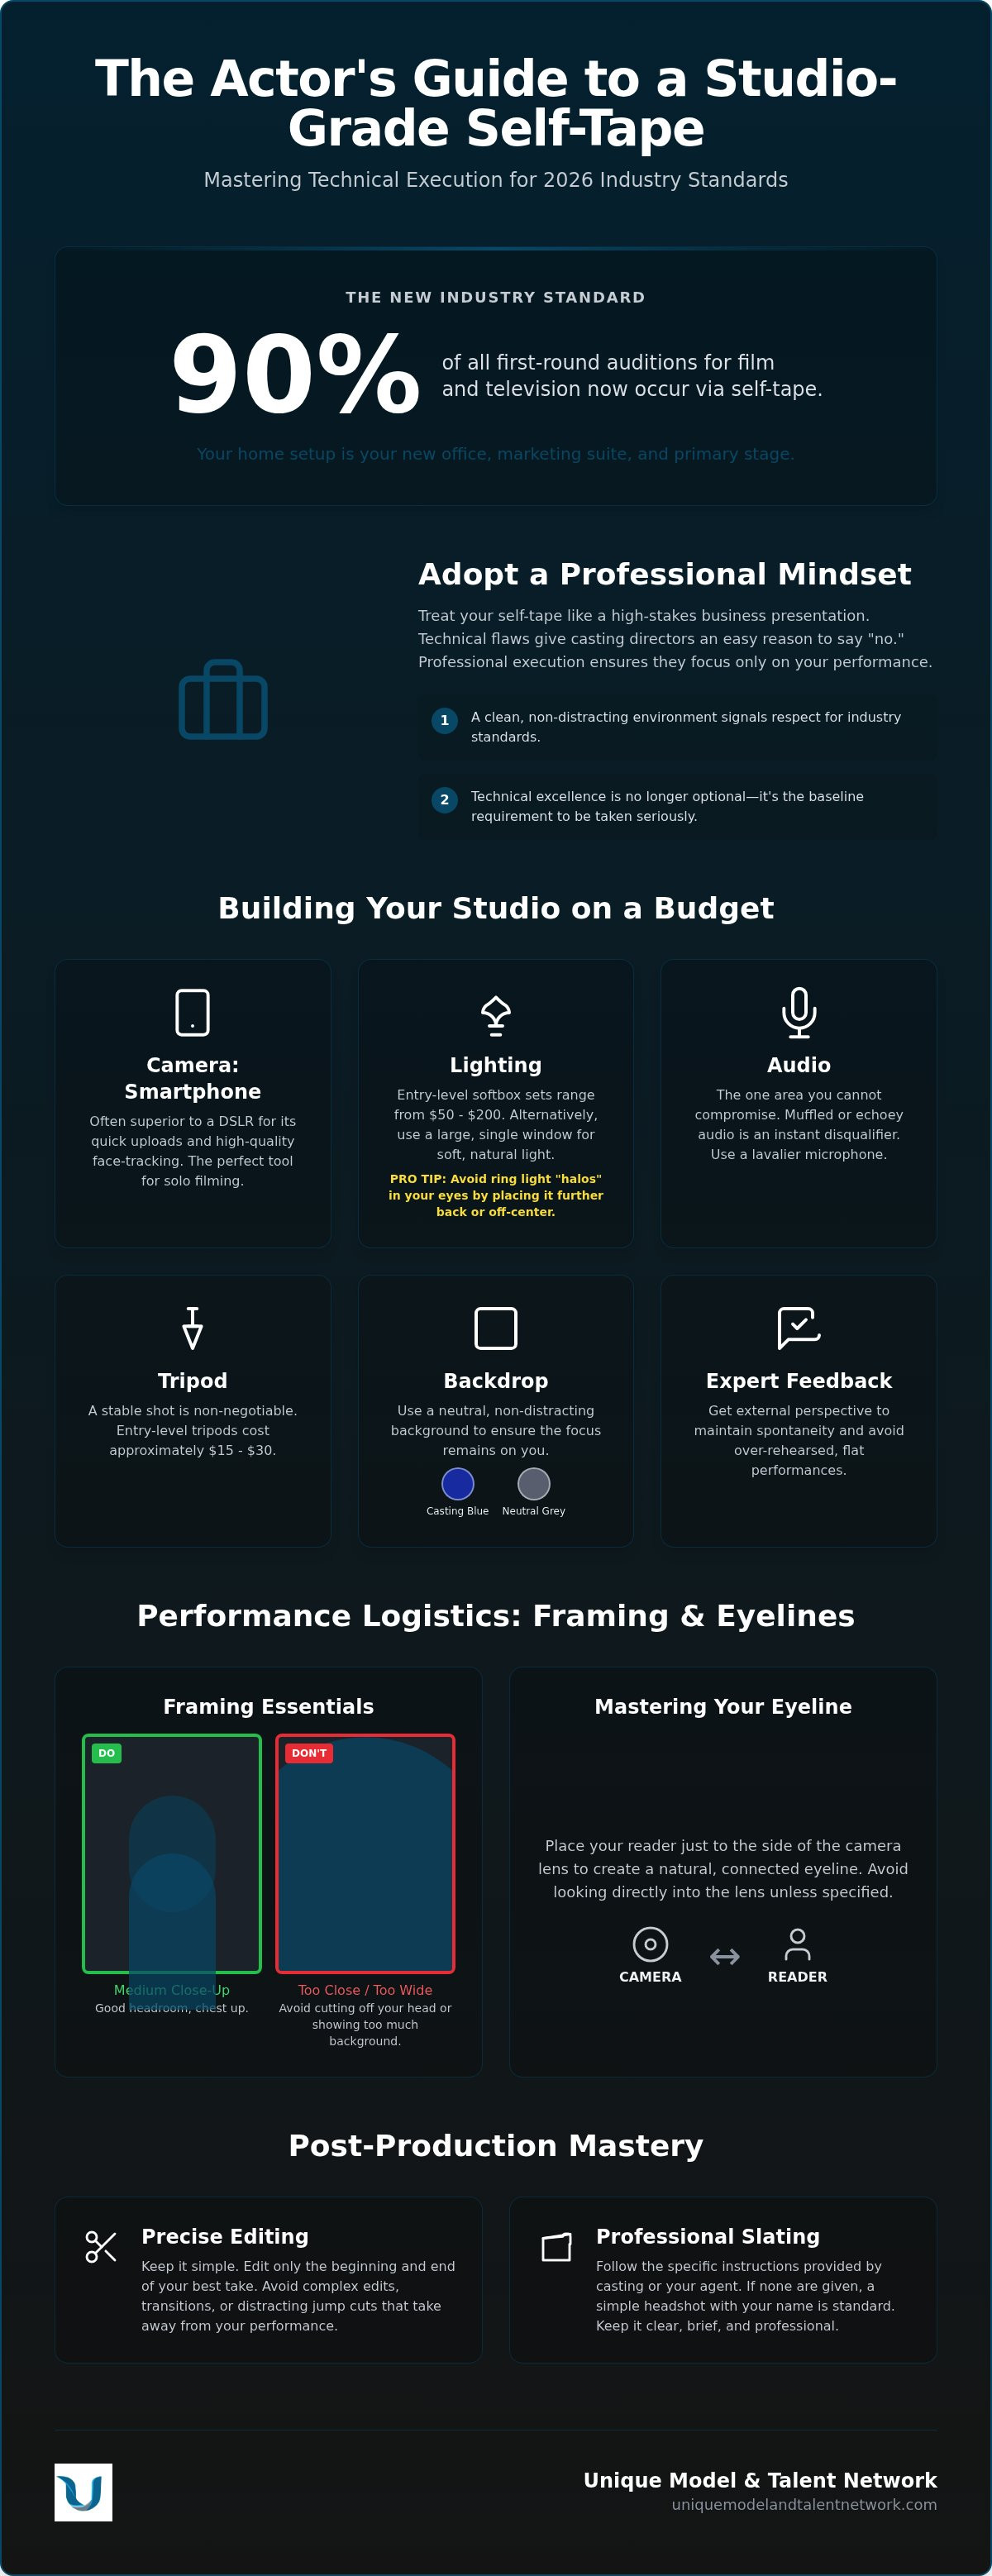
A self-tape is far more than a simple video file; it is a high-quality, professional audition recorded independently by the actor. In 2026, the industry has reached a tipping point where 90% of all first-round auditions for film and television occur via self-tape. This shift means that your home setup is no longer just a convenience. It is your official office, your marketing suite, and your primary stage. To master how to make a self tape, you must first accept that technical excellence is no longer optional. It is the baseline requirement for being taken seriously by elite agencies and production houses.
Casting directors review hundreds of submissions for a single role. Their primary task is often elimination. They are actively looking for a reason to say "no" so they can move to the next candidate. If your lighting is muddy or your audio is echoey, you've given them an easy excuse to stop watching. When you transition from an amateur approach to an industry ready standard, you remove those technical distractions. This allows the casting director to focus entirely on your talent. Learning how to make a self tape with precision is the first step toward reclaiming your agency in the casting process.
The Business Presentation Mindset
Think of your self-tape as a corporate marketing package. Your backdrop, lighting, and framing are all visual cues that signal your professionalism. A clean, non-distracting environment demonstrates that you respect the industry's standards. When you treat your recording space with the same reverence as a professional set, you communicate that you are ready for the job. This discipline is what separates hobbyists from career professionals who consistently book work through top casting websites.
Self-Tapes vs. In-Person Auditions
Understanding what an audition is helps clarify the unique demands of the self-tape format. In an in-person setting, you have the advantage of immediate feedback and redirection from a director. In a self-tape, you lose that live interaction but gain total creative control. You can record multiple takes until you nail the performance. However, the lack of outside direction can lead to safe or flat choices. You can bridge this gap by participating in acting workshops online, where you can practice your craft and receive the same level of professional critique you would find in a room. This external perspective ensures your performance remains dynamic and spontaneous even without a director in the room.
Technical Execution: Building a Studio-Grade Setup on a Budget
Building a professional setup doesn't require a second mortgage. In fact, your modern smartphone is likely a more efficient tool than an expensive DSLR. Smartphones are optimized for quick uploads and high-quality face-tracking, which is exactly what you need when you're filming solo. Understanding how to make a self tape with the gear you already own is the ultimate competitive advantage. While entry-level tripods can be found for approximately $15 to $30, the real value lies in how you use that equipment to highlight your craft.
Lighting is your next priority. You can use a "Three-Point" setup for total control or the "One Big Window" technique for a soft, natural look. If you choose artificial lights, entry-level softbox sets typically range from $50 to $200. The goal is to make your features "pop" against a neutral backdrop. Most professionals recommend a "Casting Blue" or neutral grey to avoid unwanted color casting on your skin. These choices ensure the casting director sees you, not your wallpaper.
Lighting for Three-Dimensionality
If you use a ring light, place it slightly further back or off-center to avoid the distracting "halo" reflection in your pupils. This reflection can look amateurish and pull focus from your eyes. Soften your shadows by using a diffuser or a thin white sheet to ensure your facial expressions remain visible. Avoid flat, direct lighting; it washes out your bone structure and makes your performance feel two-dimensional.
Audio and Framing Essentials
Sound is the one area where you cannot afford to compromise. A casting director might overlook a slightly dark frame, but they will never forgive muffled or echoey audio. You can secure a quality lavalier microphone for between $15 and $80, or a shotgun microphone for $50 to $100. These small investments ensure your voice is crisp and intimate. If you want to test your audio quality in a professional environment, you might consider participating in monthly skill-building challenges to refine your setup with expert feedback.
Your framing should always be a "Medium Close-Up," which means from the chest up with a small amount of "headroom" above your hair. This allows the viewer to see your eyes and your physical reactions without being uncomfortably close. Finally, never film in portrait mode. Horizontal, landscape filming is the non-negotiable industry standard for every professional submission.
The Performance Logistics: Readers, Eyelines, and Prep
Mastering the technical setup is only half the battle. Once your lights are positioned, you must shift your focus to the performance logistics that define a professional submission. One non-negotiable rule in how to make a self tape is being completely off-book. If your eyes are darting to a script, you've already lost the casting director's attention. Memorization isn't just about the words; it's about freeing your eyes to tell the story. You want the camera to capture the nuance of your thoughts, which is impossible if you're tethered to the page.
Your preparation must also include the "moment before." This is the active energy you bring into the frame the second the recording starts. Don't wait for your first line to begin acting. Start the scene internally several seconds before you speak. This ensures you don't have a "blank" look when the tape begins, making your performance feel lived-in and urgent from the very first frame.
Where to Place Your Eyeline
The "Just Off-Lens" rule is your guiding principle. Never look directly into the camera lens unless the sides specifically instruct you to break the fourth wall. Instead, place your eyeline slightly to the left or right of the camera. If you're playing a scene with multiple characters, assign a specific spot for each person. Use physical markers, like colorful tape or sticky notes on your tripod, to keep these focus points consistent. Avoid "ping-ponging" your head too rapidly between characters; subtle shifts are more effective for the medium close-up framing discussed earlier.
Modern Solutions for the Solo Actor
Finding a reader at odd hours is a common hurdle, but modern technology has solved the isolation problem. You can use specialized self-tape apps or AI-driven readers to provide cues and maintain your timing. These tools are excellent for practicing, but for the final take, a human connection is usually superior. Remote reading via Zoom or FaceTime is now the industry standard for solo performers. Connecting with a fellow performer from a vetted talent network allows you to trade takes and receive professional-level chemistry even from across the country.
In rare cases, you might use the "silent reader" technique. This involves leaving pauses for the other character's lines and reacting to the "ghost" of their dialogue. While this is less ideal than a live reader, it can work for very short, internal scenes. However, for most auditions, having a real voice to play against is what elevates your tape from a monologue to a dynamic scene. Knowing how to make a self tape that feels collaborative, even when you're alone in your room, is a hallmark of a savvy professional.
Post-Production: Editing, Slating, and Submission Mastery
Your work isn't finished when the camera stops rolling. Post-production is where you refine your presentation to meet the highest industry standards. The first step is selecting your best take. Unless a casting director specifically requests multiple versions, send only your strongest performance. Sending two takes often signals indecision rather than range. Once you've chosen, trim any dead air from the start and finish. The scene should begin with your active energy and end immediately after your final beat. This keeps the pace tight and professional for the recipient.
Naming your files correctly is a non-negotiable signature of a savvy professional. Use the standard format: Name_Role_Project. This ensures your file is searchable and organized within the casting director's database. If you are learning how to make a self tape, mastering these administrative details is just as important as the performance itself. High-level recruitment depends on efficiency; don't make the team work to identify your file. Additionally, keep your file size manageable. A 1080p file is the standard; anything larger is unnecessary and may cause playback issues on slower office connections.
The Art of the Slate
The slate is your opportunity to show your professional personality. While your performance is in character, your slate is your real self meeting the casting team. Check the instructions for whether they require a full-body shot or a tight close-up. Usually, you should state your name, height, location, and current agency representation. Unless otherwise specified, place the slate at the end of your video. This ensures the performance is the first thing they see, allowing your talent to make the initial impact before you deliver the technical details.
Submission Best Practices
When it comes time to submit, follow the instructions for the specific platform used, whether it's EcoCast, WeTransfer, or other industry-standard portals. The "One Link" rule is vital. Most casting directors prefer a single, high-quality link over multiple individual file downloads. Downloading five separate clips is a distraction that pulls the viewer out of your narrative. Before you hit send, ensure your acting portfolio is fully updated with your latest credits and headshots. A professional submission is only effective if it leads back to a verified and organized professional profile that reinforces your brand.
If you want to ensure your technical and artistic choices hit the mark before you submit, consider getting a Portfolio & Reel Review from industry insiders who know exactly what casting directors are looking for in 2026. Once you understand how to make a self tape with high technical standards, your submission becomes a powerful tool for career acceleration.
The Final Polish: Getting Expert Feedback Before You Submit
You've nailed the lighting. Your audio is crisp. You've memorized every beat. Now comes the most difficult part of the process: deciding if the work is actually good. Your own eyes are often the least reliable judge of your performance. When you watch yourself, you tend to focus on superficial details, like a minor vocal inflection or a physical insecurity, while a casting director is looking for emotional truth. Learning how to make a self tape is a technical skill, but developing the objectivity to evaluate your own work takes years of experience and a professional perspective.
There is also the danger of over-rehearsing. If you spend hours chasing the "perfect" take, you risk losing the spontaneity that makes a performance feel alive. Professional actors know that the most compelling tapes often come from the first few attempts, where the discovery is still fresh. A private community acts as a vital stress-test for your technical setup and your artistic choices. It provides a safe space to receive honest critiques before your work ever reaches a production office, ensuring that your talent is the only thing the industry notices.
The Unique Model & Talent Network Advantage
Unique Model & Talent Network provides the ultimate "rehearsal space" for your digital auditions. Members gain a distinct advantage through our structured approach to professional development, moving away from the chaos of social media toward a sense of career security. You can elevate your craft through several key features:
- Live Industry Workshops: Submit your tapes for review and receive direct feedback from real casting directors who understand the 2026 market.
- Technical Audits: Get real-time advice on whether your lighting setup or audio quality meets current industry standards.
- Skill-Building Challenges: Participate in monthly prompts that keep your self-tape muscles sharp and your equipment ready for last-minute requests.
Next Steps for Your Career
As you transition from simply applying to consistently booking, you may need to diversify your professional toolkit. Many actors find that modeling career coaching helps them master the physical awareness required for high-end commercial self-tapes. You should also focus on building a library of "stock" tapes. These are evergreen scenes that showcase your specific types and can be uploaded to your digital profiles immediately when a role fits your brand. Joining a vetted professional network ensures you aren't navigating this industry alone. It gives you the clarity and direction you need to turn every submission into a potential callback. Master how to make a self tape today, and join a community that is as ambitious for your success as you are.
Elevate Your Submissions From Amateur to Industry Standard
You've explored the technical requirements of a studio-grade setup and the administrative precision needed for professional post-production. Mastering how to make a self tape is about more than just owning the right equipment; it's about removing every technical distraction so your talent remains the primary focus. By prioritizing crisp audio, intentional eyelines, and clean slates, you present yourself as a reliable professional ready for the demands of a high-level set. This foundation ensures that when a casting director hits play, they see your craft, not your setup.
Don't navigate this competitive landscape in isolation. Real career acceleration happens when you move beyond the trial-and-error phase and embrace expert guidance. Our network offers a protective environment where your professional growth is the priority, shielding you from the unorganized noise of general social media. Ready to have your self-tapes reviewed by real casting directors? Join The Network today. You'll gain direct access to casting directors, live portfolio and reel reviews, and a private, moderated community dedicated to serious talent. It's time to stop guessing and start booking with confidence. Your craft deserves a platform that matches your ambition.
Frequently Asked Questions
Do I need a professional camera to make a self-tape?
No, you don't need a professional camera. Most modern smartphones are more than capable of producing studio-grade results. They are specifically optimized for face tracking and high-definition recording, making them an ideal choice when learning how to make a self tape on a budget. As long as you have a stable tripod and clear lighting, your phone's camera will likely outperform an entry-level DSLR for this specific purpose.
What should I wear for a self-taped audition?
Choose clothing that suggests the character's essence without becoming a full costume. Solid, rich colors like jewel tones generally look best on camera and help you stand out against neutral backdrops. Avoid busy patterns, logos, or stark white and black fabrics, as these can distract the viewer or cause technical issues with your camera's exposure. Your goal is to look professional and prepared while keeping the focus on your face.
Is it okay to use a ring light for my self-tape?
It's perfectly fine to use a ring light, but you must be careful with its placement. If the light is too close, it creates a distracting circular reflection in your pupils that can pull focus from your performance. Place the light slightly further back or off to the side to soften the effect. Using a thin white sheet as a diffuser can also help create a more natural, three-dimensional look for your features.
Should I look directly into the camera during a self-tape?
You should almost never look directly into the camera lens during your scene. Instead, use the "Just Off-Lens" rule by placing your eyeline slightly to the left or right of the camera. This allows the casting director to see the nuance in your eyes without feeling like you're staring at them. Only break the fourth wall if the script or casting instructions specifically tell you to address the camera.
How long should a self-tape audition be?
Your self-tape should be as long as the provided sides require, typically ranging from one to three minutes. Casting directors value brevity and efficiency, so don't feel the need to add long pauses or improvised moments. Focus on delivering a tight, high-energy performance that honors the writer's beats. Ensure you trim any dead air at the beginning and end of the file to keep the viewer engaged.
What is a slate in a self-tape and do I need one?
A slate is a brief technical introduction where you provide your name, height, location, and agency representation. It serves as your professional business card within the video file. When you're figuring out how to make a self tape that meets industry standards, remember that the slate usually goes at the end of the take. This ensures your performance is the first thing the casting team sees, making an immediate artistic impact.
Can I edit my self-tape performance to fix mistakes?
You cannot edit within a single take to fix a performance mistake. Jump cuts are considered highly unprofessional and will likely result in your tape being discarded. If you flub a line or lose your place, it's best to start the take over from the beginning. You should only use editing software to trim the start and end of your video or to combine multiple separate scenes into a single submission file.
What is the best color for a self-tape backdrop?
Neutral grey or Casting Blue are the most effective colors for a professional backdrop. These shades are specifically chosen by industry insiders because they don't reflect light onto your skin or create distracting color casts. A solid, non-distracting background ensures that your facial expressions and bone structure remain the focal point. Avoid using white walls or busy home environments that can make your submission look amateurish.


