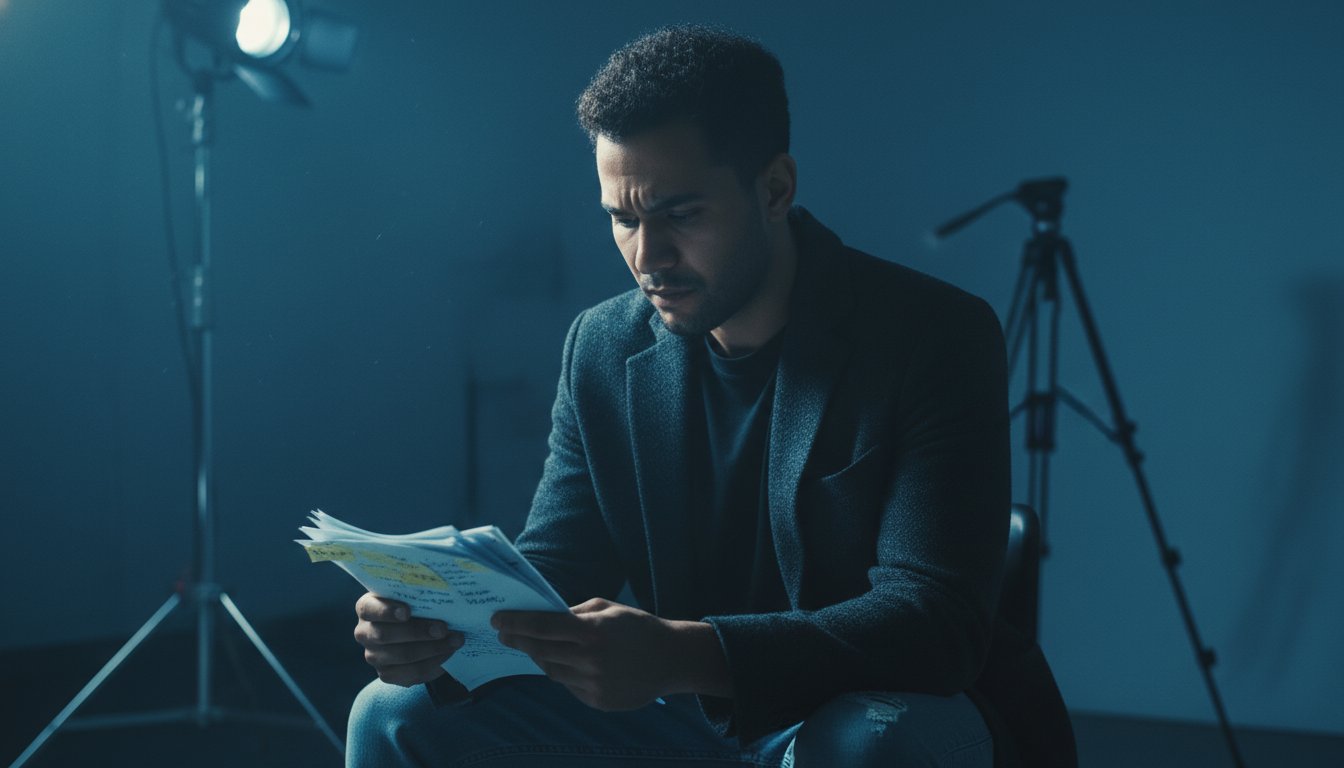
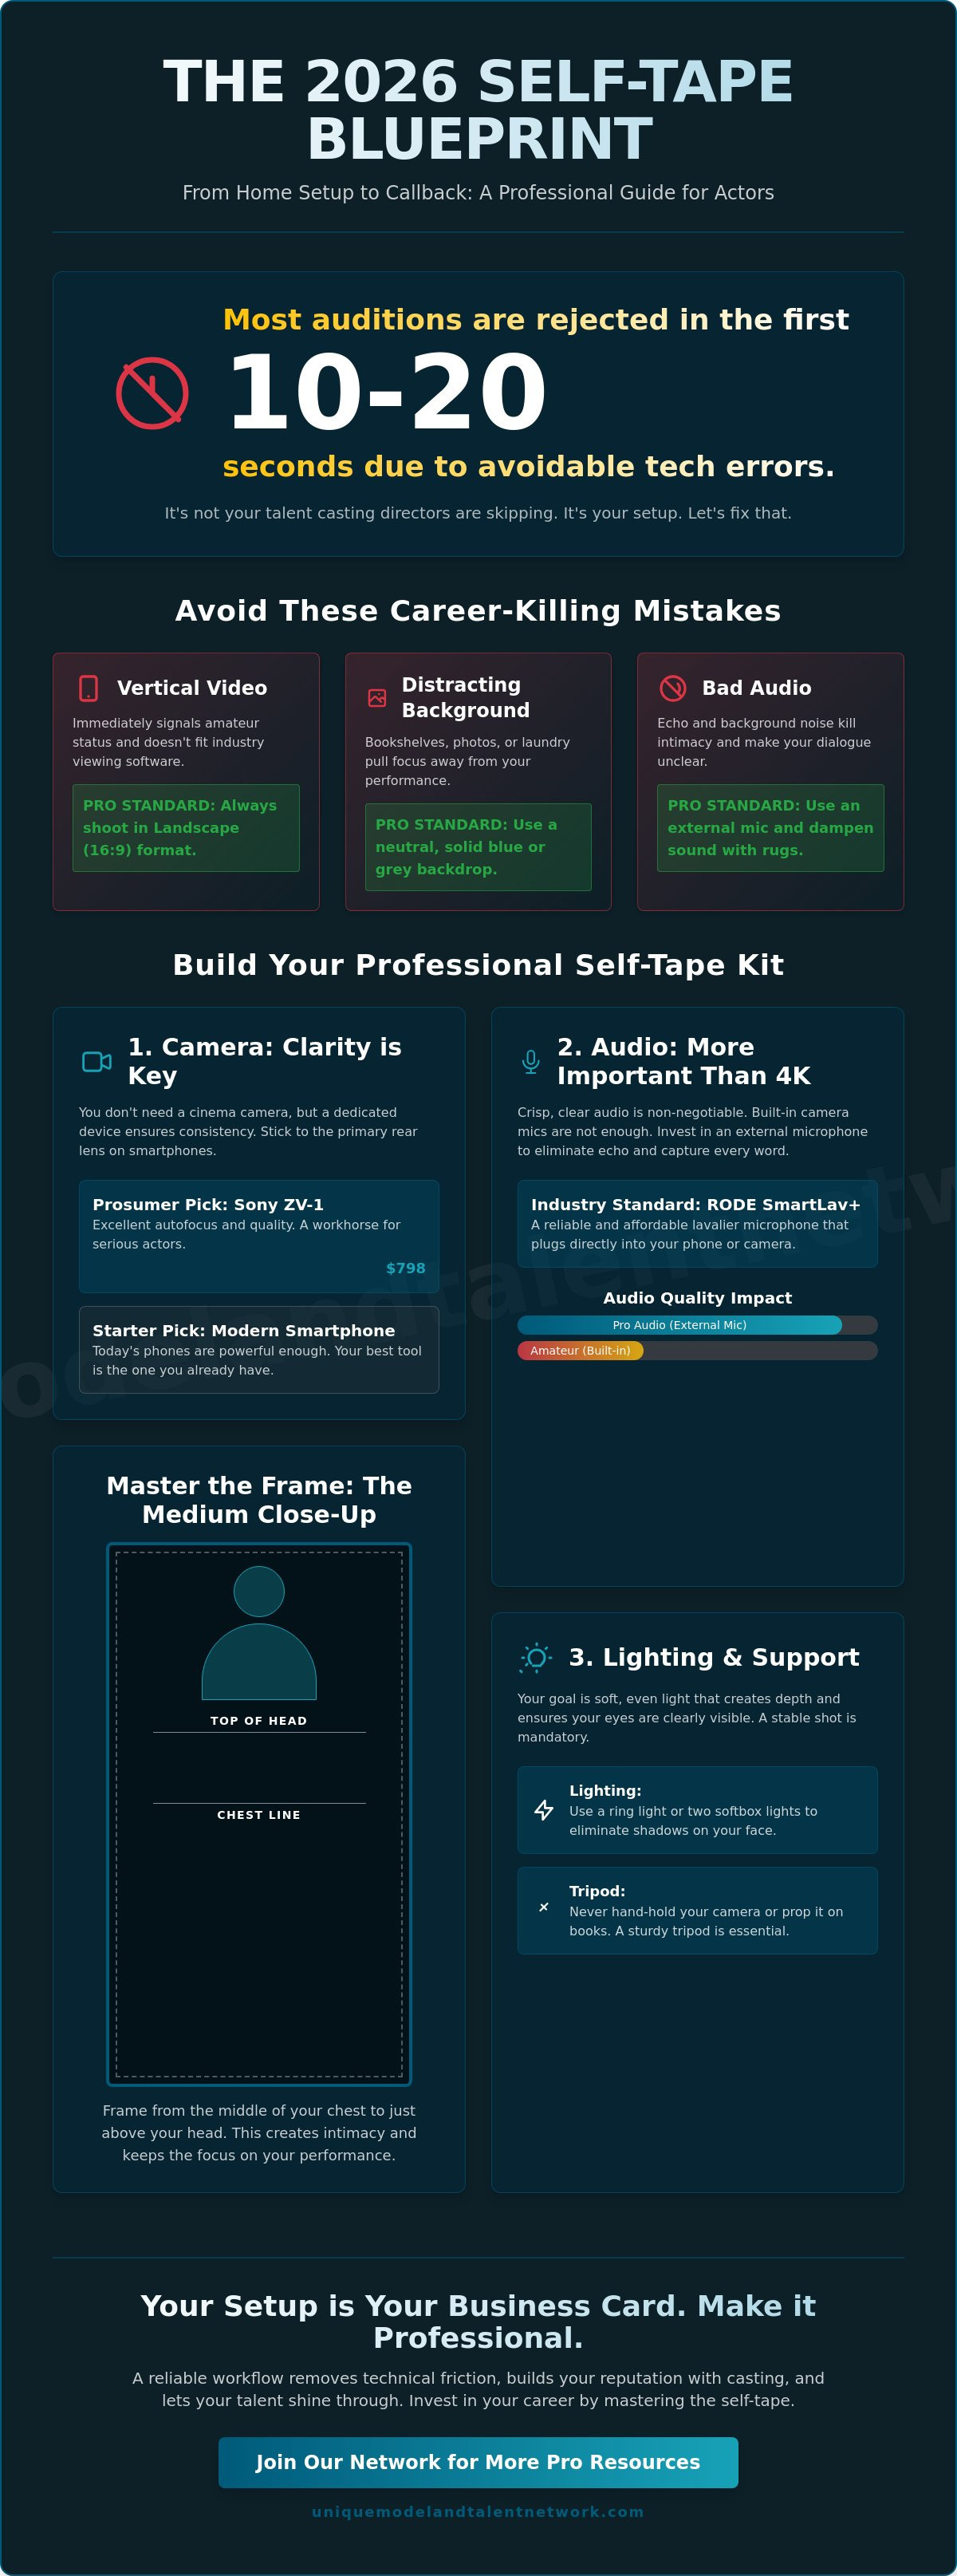
Did you know that most self-tape auditions are rejected within the first 10 to 20 seconds because of avoidable technical errors? It isn't your talent that's the problem. Often, it's poor audio or distracting framing that forces a casting director to move on before you've even finished your first line. We know the pressure of trying to turn a corner of your home into a professional self tape audition setup while racing against a 48-hour SAG-AFTRA turnaround window. It feels like you're being asked to be a cinematographer and a sound engineer when you just want to focus on the work.
You deserve a reliable workflow that removes this technical friction so your performance remains the primary focus. This guide will show you how to master the professional standards required to bypass emerging AI pre-screening filters and grab the attention of top-tier casting offices. We'll break down the essential gear for 2026, from the $798 Sony ZV-1 to the RODE SmartLav+ microphone, while explaining the latest industry regulations on sides and memorization. You're about to turn your home studio into a high-quality asset that builds career security and wins more callbacks.
Key Takeaways
- Master the technical benchmarks that signal professional readiness to casting directors and separate serious talent from hobbyists.
- Discover how to use lighting to create depth and focus on the eyes, ensuring your performance is never lost in the shadows.
- Perfect the "Medium Close-Up" framing and eyeline techniques that maintain an intimate connection with the viewer even without a live scene partner.
- Implement a repeatable self tape audition setup that allows you to meet tight submission deadlines without sacrificing file quality or professional naming standards.
- Gain the confidence to submit technical files that meet the high-stakes expectations of elite industry gatekeepers and talent evaluators.
The Industry Standard: Why Your Self Tape Setup Matters in 2026
In 2026, your self tape audition setup is no longer just a convenient way to submit for roles; it's your primary business storefront. The industry has shifted entirely to a hybrid model where self-tapes are the mandatory first step for nearly all film industry auditions. When you submit a file, you aren't just showing your acting range. You're demonstrating your ability to meet professional technical standards. High production quality signals that you're a disciplined professional who understands the modern workflow of high-stakes casting.
The evolution of auditions has moved from physical waiting rooms to high-speed digital pipelines where hundreds of actors compete for a single role within a 48-hour window. In this environment, studio-level quality is the baseline expectation. Casting directors (CDs) don't have the time to look past poor lighting or muffled audio to find your talent. They expect a clean, distraction-free digital audition that allows them to focus exclusively on your performance. If your technical execution is sloppy, it suggests your approach to the craft might be equally unorganized.
The Casting Director's Perspective
While a panel of top casting directors confirmed in early 2026 that they do watch every tape submitted, the "Three-Second Rule" still governs their initial reaction. Your thumbnail and the first few seconds of your video establish an immediate sense of trust. If the image is crisp and the sound is clear, the CD can relax and engage with your work. Technical distractions like messy backgrounds or echo trigger an immediate "skip" response. They aren't rejecting your talent; they're rejecting the friction your setup creates. Consistent, high-quality technical execution builds a reputation for reliability that leads to more callbacks.
Common Self-Tape Pitfalls to Avoid
Avoiding basic mistakes is the fastest way to elevate your professional standing. Many actors still struggle with these non-negotiable standards:
- Vertical Video: Unless you're specifically told otherwise, landscape (16:9) is the only professional choice. Vertical videos are often rejected immediately as they don't fit the standard viewing software used by production teams.
- Cluttered Backgrounds: Your environment should be neutral. Family photos, bookshelves, or visible laundry distract the eye. A solid blue or grey backdrop ensures the focus stays on your face.
- Poor Acoustics: Echo kills emotional intimacy. If you're recording in a room with hard floors, use rugs or blankets to dampen the sound. Clear audio is often more important than 4K video.
By treating your setup with the same respect you give your character work, you remove the barriers between your talent and the people who can hire you. You're not just an actor; you're the producer of your own digital career.
Essential Gear: Building Your Professional Home Studio
Building a professional self tape audition setup doesn't require a Hollywood budget, but it does require a "Kit" mentality. In an industry where a 48-hour turnaround is the standard, having your equipment organized and ready to deploy is a competitive advantage. You shouldn't be hunting for a tripod or charging batteries when you should be breaking down your script. Your home studio is your personal soundstage. It should be a dedicated space, or at least a highly organized mobile kit, that allows you to transition from receiving sides to hitting "record" in under fifteen minutes.
While some older advice suggests you need a high-end DSLR to be taken seriously, the reality in 2026 is different. Modern smartphone technology has bridged the gap. If you're just starting, your current phone is likely your best tool. As you grow, you might consider a dedicated device like the Sony ZV-1, which currently retails for $798 and offers excellent autofocus. If you prefer a used model, the discontinued Canon EOS M50 Mark II remains a solid choice for approximately $499. Regardless of your choice, the goal is clarity and consistency. You can find more technical nuances in this comprehensive guide to self-taping, which details how professional gear supports your performance.
Cameras and Smartphones
If you use a smartphone, stick to the primary rear lens. Avoid the wide-angle or "fish-eye" lenses often found on newer models; they distort your facial features and make the room look unnaturally large. Aim for 1080p resolution at 24fps for most submissions. While 4K is available, it often creates massive file sizes that are difficult to upload within tight deadlines. Crucially, always use manual focus and exposure locking. This prevents the camera from "hunting" for focus or changing brightness every time you move your hands or head during a scene.
Mounts and Stability
A shaky frame is an immediate sign of an amateur. You need a sturdy tripod with a level head to ensure your self tape audition setup remains perfectly horizontal. For those using smartphones, invest in a high-quality metal phone clamp rather than a flimsy plastic one. Stability ensures your framing stays consistent across multiple takes. Always position the camera lens at eye level. Looking down into a camera makes you appear smaller, while looking up can feel disconnected. Eye-level placement creates the intimacy required for a compelling digital audition. If you want to ensure your technical gear meets the highest standards, consider joining a community of serious professionals for a personalized review of your studio space.
Finally, your backdrop is the canvas for your work. A solid grey or blue pop-up backdrop is the industry gold standard. These colors are neutral, professional, and don't clash with most skin tones or wardrobe choices. They effectively erase the "home" from your home studio, leaving only the character behind.
Mastering Lighting and Sound: The 'Pro' Differentiators
While your camera captures the image, your lighting and sound capture the performance. A professional self tape audition setup relies on these two pillars to create a cinematic feel that separates you from the hundreds of other submissions. Many beginners rely on a single ring light, but this often results in a "flat" look that washes out your facial features and creates distracting circular reflections in your pupils. To truly stand out, you must understand how to manipulate light to create depth and character. Adhering to professional self-taping standards means moving beyond basic equipment to intentional technical choices that highlight your eyes and your emotional truth.
One of the most effective secrets of a high-level setup is the "Eye Light." This isn't a specific piece of gear but a technique. By ensuring a soft light source is reflected in your eyes, you create a "sparkle" or catchlight. This small detail makes you look more alive and helps casting directors connect with your performance. Without it, your eyes can look "dead" or sunken, especially in dramatic scenes. You don't need expensive gear for this; even a small, dimmed LED panel or a well-placed lamp can do the trick.
The Three-Point Lighting Setup
To achieve a professional, three-dimensional look, aim for a three-point lighting configuration. If you're using a common entry-level kit like the Neewer 2-pack softbox, which typically costs between €90.99 and €111.99, you're already halfway there. Your Key Light should be your strongest source, placed at a 45-degree angle to your face. Use a Fill Light on the opposite side at a lower intensity to soften harsh shadows. Finally, a Back Light placed behind you helps separate your shoulders from the backdrop, preventing you from looking like a "flat" image against the wall.
Audio Solutions for Actors
Poor audio quality is the most common reason a casting director will stop watching a tape. The internal microphone on your phone or camera is rarely sufficient because it picks up every ambient sound in the room. For a reliable, professional sound, a lavalier microphone like the RODE SmartLav+ is a popular choice, currently priced between $60.10 and $89.00. If your room has a "bathroom" echo, don't worry. You can treat the space by hanging heavy blankets just out of frame or laying down rugs to absorb the sound waves.
When recording with a reader, ensure they are standing further away from the microphone than you are. You want their voice to be clear but secondary. If they drown you out, it pulls the focus away from your performance. If you find yourself with persistent background hum, Apple's iMovie is a free, pre-installed tool on Mac and iPhone that offers basic noise reduction to help clean up your files before submission.
Environment and Performance Workflow
Mastering your self tape audition setup requires more than just high-end lighting; it demands a disciplined performance workflow that respects the casting director’s time. Under current 2026 SAG-AFTRA regulations, you are typically granted a 48-hour turnaround for theatrical self-tape requests. This window is designed to protect your professional boundaries, but it also means your environment must be ready to capture the "Medium Close-Up" standard at a moment's notice. Efficiency in your workflow ensures that you spend your energy on the character rather than technical troubleshooting.
The Perfect Medium Close-Up
The industry standard for a self-tape is the medium close-up, which frames you from the chest up. This allows casting directors to see your facial expressions clearly while still capturing your physical presence. When setting your frame, pay close attention to headroom. You should leave a small, intentional gap above the crown of your head. If you leave too much space, you look small and diminished; too little, and you look crowded. While you should remain natural, keep your movements contained. Large, theatrical gestures can easily take you out of frame or cause the camera’s autofocus to hunt, breaking the immersion of the scene.
Eyelines and Interaction
One of the most critical elements of your self tape audition setup is the eyeline. Avoid the common trap of looking directly into the lens unless the breakdown specifically requests it. Your eyeline should be placed just off-camera, either to the left or right of the lens. If you have multiple characters to address, choose two distinct points at the same height as the camera. This creates a sense of space and interaction without you ever losing your connection to the viewer.
If you don't have a live partner available, professional virtual reader apps are now a standard industry tool. These are far superior to the casual suggestion of having an untrained friend read lines over a speakerphone. Virtual readers allow you to control the pacing and volume of the cues, ensuring the "reader" never drowns out your performance. If you want to refine your performance workflow under the guidance of experts, you should join our live industry workshops to practice these techniques in real-time.
Finally, remember the rules regarding slating and sides. In 2026, you are not required to memorize your sides for a self-tape; you are permitted to hold them or use a prompter. If a project requires memorization, it's classified as a virtual audition, not a tape. When slating, follow the instructions to the letter. This usually involves a separate full-body shot and a brief introduction. Keep it professional, concise, and focused. Your slate is the first glimpse of your professional personality, so treat it with the same level of care as the scene itself.
Submission and Growth: Beyond the 'Send' Button
Completing your performance is only ninety percent of the job. The final ten percent—editing, naming, and submitting—is where many talented actors lose their professional edge. If you send a file that's too large to download or use a generic filename like "Scene_1.mov," you're creating unnecessary friction for the casting team. In 2026, casting directors manage hundreds of digital files daily. They prioritize submissions that are organized and easy to process. Finalizing your self tape audition setup workflow with a rigorous technical review ensures your work actually reaches the decision-makers in its best possible form.
The Submission Checklist
Before you hit export, watch your best take one last time with a critical eye. Look for "eye-dart," which happens when you look at your script or prompter too frequently, breaking the emotional connection. Check for any technical glitches, like a sudden pop in the audio or a flicker in your lighting. When you're ready to export, follow these standards:
- Naming Convention: Use the "Firstname_Lastname_Role_Project" format. This is the non-negotiable industry standard for 2026.
- File Format: Use H.264 or HEVC for the best balance of high quality and manageable file size. For Mac and iPhone users, Apple’s iMovie is a free, pre-installed tool that handles these exports perfectly.
- The Slate: Always follow the specific instructions in the breakdown. Unless told otherwise, place your slate as a separate file or at the very end of your performance clip.
Accelerating Your Career with Feedback
Submitting in a vacuum is a recipe for stagnation. To grow, you need an external perspective that identifies your blind spots. Engaging with acting industry networking platforms allows you to connect with peers and mentors who can provide honest critiques of your work. This community support is vital for maintaining high standards and staying motivated during the "holiday lulls" or quiet periods in the industry.
At the Unique Model & Talent Network, we provide the tools you need to move beyond basic technical proficiency. You can access a professional portfolio review for actors to ensure your digital presence matches the quality of your tapes. We also host monthly skill-building challenges designed to keep your self tape audition setup ready and your instincts sharp. Once you've mastered the technical delivery, the next step is refining your craft through acting workshops online. Your home studio is the foundation, but your continued commitment to growth is what will ultimately lead to more callbacks and a sustainable career.
Elevate Your Career Standards
Your self tape audition setup is more than just a collection of equipment; it's the foundation of your professional reputation. By mastering the technical workflows of 2026, you've ensured that your performance is never overshadowed by poor audio or distracting backgrounds. You now have the tools to meet tight deadlines with confidence and precision. However, technical proficiency is only the beginning of your development. True growth happens when you step out of the home studio and into a community of high-level professionals who can provide the clarity you need to succeed.
If you're serious about your craft, join the Unique Model & Talent Network for professional reel reviews and expert feedback. Our platform is managed by industry experts with over 20 years of experience, offering you a direct bridge to tangible success. You'll benefit from live workshops with Casting Directors, monthly skill-building challenges, and a supportive network that understands the grounded reality of the business. Take this opportunity to invest in your future and secure your place in the industry. We're ready to help you reach your full potential.
Frequently Asked Questions
What is the best color for a self-tape background?
A neutral grey or blue is the industry standard for a self-tape background. These colors are non-distracting and complement most skin tones without causing the camera's auto-exposure to fluctuate. Avoid white, as it can wash you out, or busy household environments that pull the focus away from your performance. A clean, solid backdrop signals that you take your professional presentation seriously.
Can I use a ring light for my self-tape audition setup?
You can use a ring light, but it often creates a flat, two-dimensional look that lacks character. To improve your self tape audition setup, consider placing the ring light slightly off-center and adding a secondary light source to create depth. Be mindful of the circular reflections in your eyes; some casting directors find these distracting compared to the natural look of softbox lighting.
How do I film a self-tape if I don't have a reader?
Use a professional virtual reader app to manage your cues if you don't have a live partner. These tools allow you to record the other character's lines and control the timing during your takes. Avoid having a friend read over a low-quality speakerphone. The poor audio quality and lack of presence can ruin the professional polish of your submission and distract the viewer.
Should I edit my self-tape auditions?
Edit your tapes only to trim the beginning and end of takes or to stitch the scene and slate together. Avoid using digital filters, transitions, or background music; these are considered unprofessional. Your goal is a clean, raw performance that meets technical standards without looking over-produced. Casting directors want to see your authentic self, not your skills as a video editor.
Where should I look during a self-tape audition?
Your eyeline should be placed just to the left or right of the camera lens at eye level. Looking directly into the lens is usually reserved for slating or specific direct-address roles. By looking slightly off-camera, you create the illusion of a scene partner. This technique keeps the casting director focused on your emotional reactions rather than making them feel like they are being stared at.
How long should an acting slate be?
An acting slate should be concise, typically lasting between 15 and 30 seconds. State your name, height, location, and any other specific information requested in the breakdown. Keep your personality professional and warm. This is the casting director's first glimpse of who you are as a collaborator. Don't overthink it; just be yourself and follow the instructions provided to the letter.
What file format should I use for my self-tape?
Use the MP4 or MOV file format with H.264 or HEVC compression for your submission. These formats provide the best balance of high visual quality and manageable file sizes for quick uploading. Always follow the specific naming conventions provided in the casting call. This ensures your file is easily searchable in the database and demonstrates that you can follow complex industry instructions.
Do I need a 4K camera for self-tapes?
You don't need a 4K camera to create a professional self tape audition setup. Most casting directors prefer 1080p resolution because it provides excellent clarity without the massive file sizes associated with 4K. High-definition video at 24 or 30 frames per second is the current baseline for professional theatrical and commercial submissions. Focus on lighting and audio instead, as these impact quality more than resolution.