

Your modeling digitals don’t need a studio, a photographer, or a complicated setup. The goal of learning how to take your own modeling digitals is to show your current appearance clearly, not to create a polished campaign image. A simple setup with even light and a steady phone can help you capture the angles a recipient asks for.
Heavy styling and retouching can work against the purpose of digitals: giving agencies and clients an honest view of you. Keep the process straightforward, follow each recipient’s submission instructions, and focus on clear, recent photos rather than elaborate production.
This guide covers choosing a location and outfit, setting up your phone, and capturing close-up, profile, and full-body views. You’ll also learn how to select and prepare images without filters or retouching, so you can check that they meet each recipient’s specific requirements before submitting.
Key Takeaways
- Learn how to take your own modeling digitals with a simple phone setup, a steady camera, and soft natural light.
- Use a practical shot list to capture clear face, profile, three-quarter, and full-length views.
- Choose focused images that represent your current appearance, without retouching that changes your features.
- Retake your digitals when they no longer look like you, and check each recipient’s requirements before submitting.
- Use a final review checklist to assess clarity, accuracy, and safe submission practices.
What Modeling Digitals Show, and Why Natural Photos Matter
Modeling digitals, sometimes called “polaroids,” are straightforward photos that show what you look like now. They aren’t meant to tell a story or present a finished character. In short, modeling digitals are simple, current images that show a model’s natural appearance; they are not retouched portfolio photos, promotional cards, or social media portraits.
Agencies and clients may request natural images to assess features and proportions without styling or visual distractions. The modeling profession includes many types of work, so the qualities and images being assessed can vary. Check the specific submission instructions rather than assuming every recipient wants the same shots or format.
What should modeling digitals communicate?
They should make your recognizable facial features, proportions, and overall appearance easy to see. A clean background, simple clothing, and straightforward framing keep attention on you. The aim isn’t to look more polished or fit a particular idea of beauty. It’s to provide an accurate, current representation that someone can assess for their needs.
Elaborate production can distract from that purpose. Strong digitals don’t guarantee an agency’s interest, representation, or bookings; they provide clear information for an initial evaluation. If you’re learning how to take your own modeling digitals, prioritize accuracy over making every frame look like a campaign image.
Digitals, headshots, and portfolio photos: what is the difference?
Each image type serves a different purpose. A headshot concentrates on the face, while digitals typically include additional angles and full-length views, depending on the recipient’s requirements. Portfolio photography is more creative, and may use styling, lighting, locations, or poses to show range and convey a concept. A comp card is a promotional piece that presents selected images and relevant details, rather than a substitute for a complete set of digitals.
Social media photos can be expressive and highly edited, but may not communicate your appearance consistently. Keep submission digitals distinct from that content. For broader portfolio context, a guide to building an acting portfolio can help explain how selected, creative work differs from simple evaluation images.
How to Set Up Your Phone, Background, and Light for Modeling Digitals
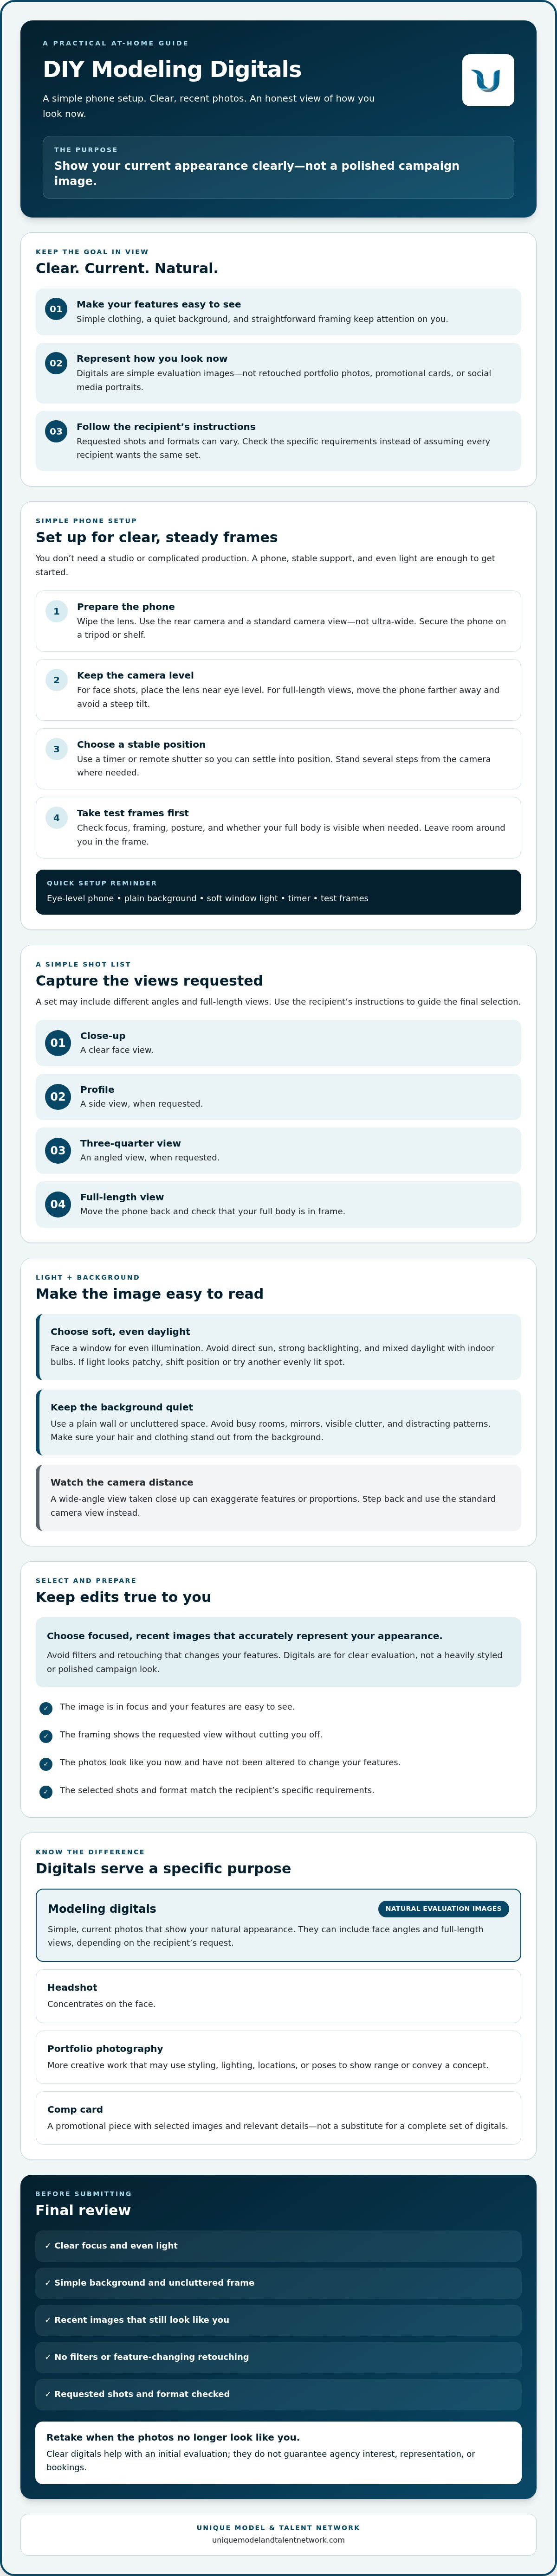
A simple, repeatable setup is enough to create clear digitals at home. Use your phone’s rear camera, a stable support such as a tripod or secure shelf, and a timer or remote shutter. Choose an uncluttered space where you can stand several steps from the camera and find even light.
- Wipe the camera lens and secure your phone at the right height.
- Use a timer or remote shutter so you can settle into position before each frame.
- Take test shots to check focus, framing, and whether your whole body is visible when needed.
- Choose a simple background with enough contrast to distinguish your hair and clothing from it.
Quick setup tip: Secure your phone at eye level, step back from a plain background, face soft window light, and use a timer to check a few test frames before you begin.
How can you take modeling digitals alone with a phone?
For face shots, position the lens near eye level so the camera isn’t looking sharply up or down at you. For full-length views, move the phone farther away and keep it level instead of tilting it steeply. Use the standard camera view, not an ultra-wide setting, and step back to fit the frame. A wide-angle view taken close up can exaggerate features or proportions.
Review each test frame before shooting the full set. Check that your face is in focus, your posture isn’t cut off, and there’s room around you in the frame. For more guidance, Backstage’s how to take modeling digitals guide offers advice on the photo process.
Which lighting and background make digitals clearer?
Soft daylight near a window can illuminate your face evenly and show its features without strong shadows. Turn toward the light, but avoid direct sun that creates harsh contrast. Strong backlighting can leave your face too dark, while a mix of daylight and indoor bulbs may create uneven color. If the light looks patchy in a test frame, shift position or try another evenly lit spot.
Choose a plain wall or similarly quiet background. Avoid busy rooms, mirrors, visible clutter, and patterns that compete with your outline. Check that your hair and clothing remain easy to distinguish from the background. The professional network and learning opportunities include workshops and portfolio reviews for people developing their industry knowledge and materials.
Which Modeling Digital Photos to Take: A Simple Shot List
Start with the recipient’s instructions. One agency may request particular angles, while another may specify its own image count, framing, or file format. Treat the list below as a planning guide, not a universal rule. If the instructions differ, follow them.
Shot-list summary: Capture the views requested, commonly a clear face shot, profile, three-quarter angle, and full-length views, with a natural expression and posture.
Which basic angles and views should you capture?
If no specific sequence is provided, plan a small set of distinct views. Take a close face image looking toward the camera, then a profile that clearly shows your side view. A three-quarter angle adds another perspective. For full-length images, a front view and a side view may be useful if requested. Some recipients ask for additional angles, so check their submission page before taking your final set.
- Face: Look toward the lens with a relaxed, neutral expression.
- Profile: Turn to the side without tilting your head or lifting your chin.
- Three-quarter: Rotate slightly from the front, keeping your gaze natural.
- Full length: Stand comfortably and make sure your entire outline is visible.
Think of the sequence as a clear visual introduction, not a performance. For broader context on breaking into the industry, remember that submission materials help professionals assess fit, but no particular set of photos guarantees interest or representation.
What should you wear and how should you pose?
Choose simple, well-fitting clothes that let the viewer see your outline. Neutral or dark, solid colors are practical; skip logos, busy patterns, and loose layers that hide your shape. Wear something you can stand and move in comfortably. If a recipient specifies wardrobe, follow that direction.
Keep your posture easy and balanced. Stand tall without stiffening, let your shoulders rest naturally, and make small adjustments between frames. Avoid dramatic angles, exaggerated expressions, or editorial gestures that change the purpose of the image. Move hair away from your face when needed to keep your features clear. Each frame should help someone see you, not guess what’s behind the styling.
That straightforward approach is useful when learning how to take your own modeling digitals. A few deliberate views captured according to the recipient’s instructions are more helpful than a large collection of near-identical poses.
How to Choose and Prepare Modeling Digitals Without Over-Editing
Review your shots as a set rather than choosing only the most flattering frame. Digitals should give a consistent impression of your current appearance across the requested views. Large differences in lighting, expression, or color can make the set feel less cohesive.
- Focus: Choose frames where your face and features are sharp, not blurred by camera movement.
- Visibility: Check that your face and body are unobstructed and fully shown where the framing calls for it.
- Expression: Look for a relaxed, natural expression rather than a forced smile or exaggerated pose.
- Consistency: Compare the images for similar lighting and color so they present a clear, accurate impression together.
How much editing is appropriate for modeling digitals?
Limit adjustments to improving clarity without changing what you look like. A modest crop or a small correction to exposure or color may help if the original image is too dark or poorly framed. Preserve visible skin texture, facial features, and natural proportions. Avoid filters, skin smoothing, reshaping, or effects that alter your appearance.
Ask yourself whether the image would still look like you in person, under ordinary lighting. Keep the original files so you can compare any basic corrections with the unaltered photos. If an edit changes a feature instead of simply making the image easier to see, leave it out.
- Useful cleanup: Cropping excess empty space or gently correcting brightness.
- Misrepresentative editing: Smoothing skin, changing proportions, or applying a filter that shifts your coloring.
How do you prepare digitals for an agency submission?
Check each recipient’s current submission directions before exporting or sending anything. They may specify the file type, image size, naming format, number of photos, or submission method. Don’t assume one agency’s requirements apply to another. If no naming instructions are given, use clear filenames that identify the view, such as “FirstName_Front” or “FirstName_Profile.” Keep the files straightforward and skip decorative text, borders, or graphics.
As you learn how to take your own modeling digitals, use the recipient’s instructions first and keep every image honest and easy to review. Unique Model & Talent Network offers educational workshops and portfolio reviews for people seeking industry learning and feedback. These opportunities don’t constitute representation or guarantee bookings.
Keep Your Modeling Digitals Current and Get Useful Feedback
Digitals are most useful when they still represent how you look now. Retake them after a meaningful appearance change, such as a new hairstyle or hair color, or whenever your current images no longer feel accurate. Before submitting, check for blur, poor lighting, or other issues that make your features hard to assess. There’s no single update schedule for every model, so follow each agency or recipient’s guidance.
When should you update your modeling digitals?
Update your images based on accuracy, not a calendar alone. A small change may not require a new set, but a noticeable difference in your appearance can make older photos misleading. Check that your images are clear and consistent before sending them. If you’re unsure whether a change matters, compare the photos with your current appearance and consult the recipient’s instructions.
Use this final check before submitting:
- Accuracy: Do the photos reflect your current appearance without edits that change your features?
- Clarity: Are your face and requested views in focus, visible, and well lit?
- Requirements: Have you followed this recipient’s instructions for image views, file type, naming, and submission method?
- Safe submission: Are you sending images through the recipient’s official submission channel? Be cautious of pressure to pay immediately, promises of fame, or requests for inappropriate images.
Where can aspiring models get constructive feedback?
Ask someone you trust, ideally a person familiar with professional submissions, to check whether the images are clear, natural, and easy to assess. Ask for specific feedback. “Can you see my features clearly?” is more useful than “Do I look good?” A fresh perspective can catch framing problems or inconsistent lighting you may have missed.
Workshops and portfolio reviews can also support learning and provide feedback. They are educational opportunities, not representation, and don’t guarantee bookings or other work. Modeling career coaching may also help you think through your goals alongside your submission materials.
Unique Model & Talent Network’s workshops, portfolio reviews, and other educational resources are available to people who want to keep learning with an industry-focused community. You can create and submit your digitals without joining a network. A thoughtful process for how to take your own modeling digitals starts with clear images, current information, and careful attention to each recipient’s instructions.
Build a Clear, Current Set of Digitals
Learning how to take your own modeling digitals is about making your current appearance easy to assess, not creating a heavily produced shoot. Use a simple setup, capture the views each recipient requests, and choose focused, natural images that haven’t been edited to change your features.
Before submitting, check that your photos still represent you, follow the recipient’s file and submission instructions, and are sent through a legitimate submission channel. A trusted, knowledgeable person can help you spot unclear framing or images that feel inconsistent.
Unique Model & Talent Network offers portfolio reviews and live industry workshops for educational feedback. Its community connects emerging talent with industry professionals, including photographers. These resources support learning and feedback; they don’t provide representation or guarantee work.
To build your industry knowledge and get educational feedback, explore the Unique Model & Talent Network’s educational community. Keep your digitals clear, accurate, and aligned with the recipient’s instructions, then submit them with confidence.
Frequently Asked Questions
Can I take modeling digitals by myself with a phone?
Yes, you can take modeling digitals by yourself with a smartphone. Secure it on a stable support, use a timer or remote shutter, and take test frames to check focus and framing. For close-ups, place the camera near eye level. For full-length shots, move it farther away and keep the lens level. Follow the recipient’s directions for required angles and image format.
What should I wear for modeling digitals?
Choose simple, fitted clothing that lets your outline remain visible. A plain top with well-fitting pants in a neutral or dark color is a practical option. Avoid logos, bold patterns, and loose layers that hide your shape or distract from your appearance. Keep hair away from your face when needed to show your features clearly, and follow any wardrobe directions from the recipient.
Do modeling digitals need to be retouched?
No. Digitals should represent your current appearance, so avoid filters, skin smoothing, reshaping, and edits that change your features or proportions. A basic crop or a small brightness adjustment may help make a photo easier to view, as long as it stays accurate. Keep the original files for comparison, and check the recipient’s instructions before preparing or sending your images.
Which photos should I include in modeling digitals?
Include the views requested by the agency or client, since requirements can differ. A common set may include a clear face view, a profile, a three-quarter angle, and full-length views from the front or side. Some recipients request other angles or a specific number of images. Check the official submission directions first, then select focused, natural frames that show you clearly.
Do I need a professional camera to take modeling digitals?
No, a professional camera isn’t essential for clear digitals. A smartphone can work if the lens is clean, the phone is steady, and the image is in focus. Use soft, even light and avoid getting too close with a wide-angle view, which can distort proportions. Check the recipient’s requirements for image quality, file type, and size before submitting.
How often should I update my modeling digitals?
Update your digitals when your appearance changes enough that the existing photos no longer look like you, or when the images are blurry, poorly lit, or outdated. Some agency guidance recommends refreshing them every three to six months, but schedules vary. Review each recipient’s current instructions and use recent images that accurately reflect your appearance at the time you submit.
Can modeling digitals guarantee that an agency will sign me?
No. Digitals help an agency assess your appearance, but they can’t guarantee interest, representation, auditions, or bookings. Decisions depend on the agency’s needs and other factors beyond the photos. Submit clear, accurate images through the agency’s official process and follow its instructions. Be cautious of anyone who promises fame or pressures you to pay immediately.


